Tutorial:
Transfer Polar Flow (TCX) Data to Polar ProTrainer 5 (HRM) with JW HRM-GPX-TCX Tool
Polar offers along with their new devices an upload to their web services. With latest ProTrainer releases it is also possible to upload the exercises to it. However, it isn’t possible to download the data from the new devices into your local PolarTrainer software and using it further as your sports tracking tool working on your local computer.
With JWHGT tool this will be possible. However, there are quite a few tricks that are helpful to know and which I will describe here.
1 Export Excercise Data from Polar Flow
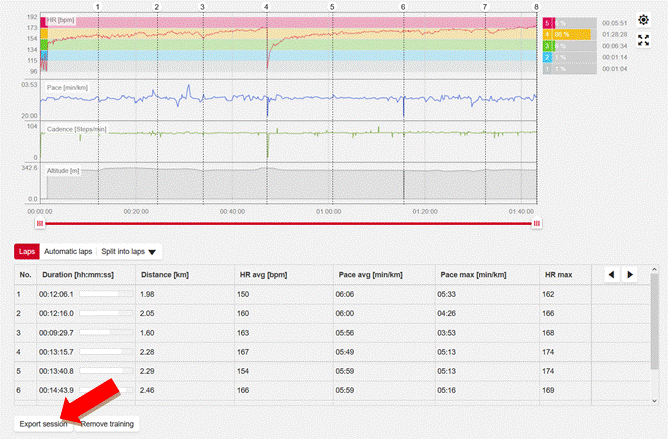
On the Exercise Details page of Polar Flow service, use the “Export Session” button, choose to export as TCX format and save the file in a directory of your choice.
2 Import Excercise Data to JWHGT Tool
Import the file into the JWHGT Tool, make sure in preferences UTC timezone is set for importing TCX files.
3 Adjust Preferences and Export HRM File Data
Before exporting the data to the HRM format, you might want to ensure you have certain preferences set up.
In case you made breaks during recording the exercise you might want make use of the Pause Removal feature (see also respective chapter in manual).
In case you want to export recorded laps as lap times, go sure that the preference is not set to not export lap times.

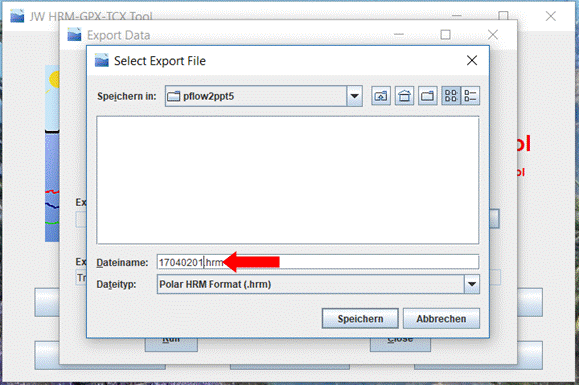
Finally, export the HRM file.
Important:
Polar ProTrainer needs files to be saved in a certain directory and using a special naming convention.
· File location: this is the directory where all imported HRM files get imported. The directory can be set up in the application individually. Typically it will be stored in a directory with your name, and in a sub-folder for the respective year. E.g. “…\Bob Foo\2017”.
· File Name: The HRM file must be named exactly like this: first two digits: year of exercise (e.g. “17” for 2017), next two digits month of exercise (e.g. “04”), next two digits day of exercise (e.g. “02”). The last 2 letters is, a little bit simplified for this purpose, the number of the next free HRM file on this location. If your current exercise is the first one on that day the number will be “01”. In case already other HRM files got imported, look for the next free file number. If there is already a file “17040202.HRM” then choose “17040203.HRM”.
4 Adjust Preferences and Export GPX File Data
In case you want also to transfer a fitting GPX file to Polar ProTrainer (optional), several settings must be used.
· Use the same Pause Removal settings as used for HRM file export.
· Polar doesn’t save other data into GPX files than timestamps and locations. So you could remove basically everything else (e.g. heart rate, …) from export. But usually these data won’t disturb. However, I recommend to disable Waypoint export here since it seems ProTrainer will create then a kind of additional path then.
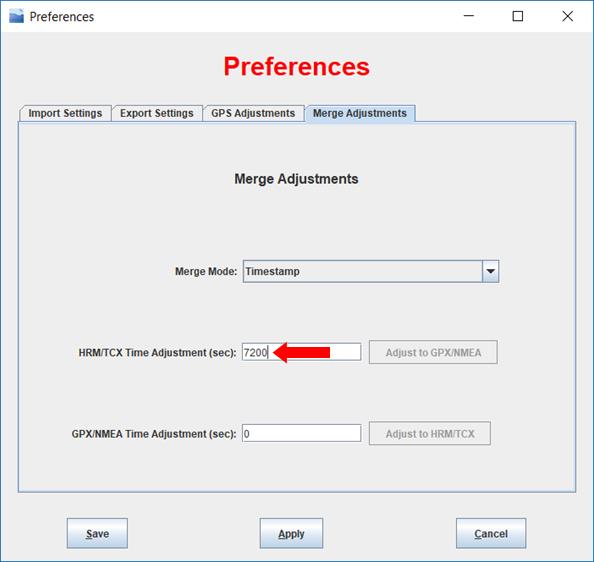
· Polar ProTrainer will use the local time zone for converting the GPX file timestamps, although the standard is UTC and also timestamps to be marked as if they would be UTC timestamps. Therefore, you still need to have the export time zone “UTC” set up in Export Preferences! But in order the time values will fit to those of the HRM file, you will need to use time adjustments in case the local time zone is different to UTC. Enter the time difference in seconds to the UTC time zone as positive or negative number as Time Adjustment in Merge Preferences (e.g. 7200 for 2 hours in case of Central European Summer Time).
· File Location and File Name (appart from the different “.GPX” instead of “.HRM” file name suffix) must be identical to the HRM file!
5 Import Data to Polar ProTrainer 5
Once you saved your file(s) with the correct names at the right location, you will be able to import the exercise data into Polar Trainer 5.
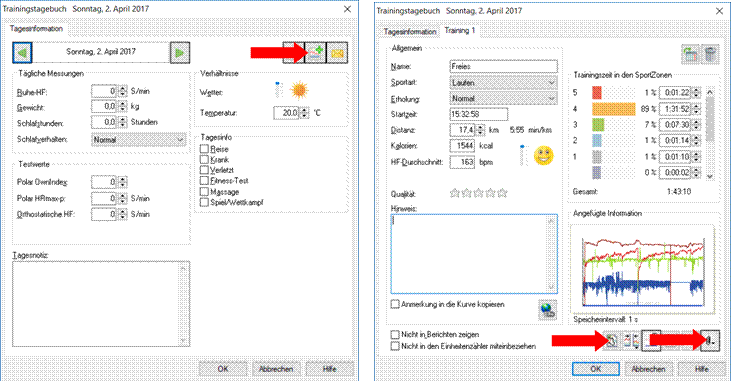
On the calendar, double-click the day of the exercise. On the opening window use the respective icon to add a new exercise.
There, you can use the icon to attach exercise and select the HRM file you exported before.
As a result, all kinds of information is loaded into the input fields and you can go on with editing and saving the data.
In case you created a GPX file in addition and everything worked out correctly with the special settings done before, the symbol for GPS track information should be shown automatically.
6 Optional: Import Running Index and RR-Data (Heart Rate Variability)
In case a Running Index was calculated and/or Heart Rate Variability data can be downloaded for your session you might want to transfer that data as well.
This has to be done after before mentioned steps and I have developed two dedicated mini-tools just for that specific purpose as the required steps are a bit cumbersome doing it all manually and they also wouldn’t fit well into the JWHGT application workflow and design:
For updating Running Index: JWUpdateRunIndex
For creating RR information: JWCreateRrHrm
Please have a look at my homepage for further information about these tools.
All trademarks are © by their respective owners.
Polar Flow and Polar ProTrainer are trademarks of Polar.
This webpage and software is a private offer and not provided by Polar.